


pdf
Printer Friendly
(1.10 MB)
(PDF)
pdf
Printer Friendly Spanish
(610 KB)
(PDF)
Best Practices
- RevealShield SA Self-Adhered building layout should be planned prior to application to minimize waste, this process will assist locating penetrations that will need to be correctly detailed to ensure a weather and air tight installation.
- RevealShield SA Self-Adhered can be installed in a vertical or horizontal direction.
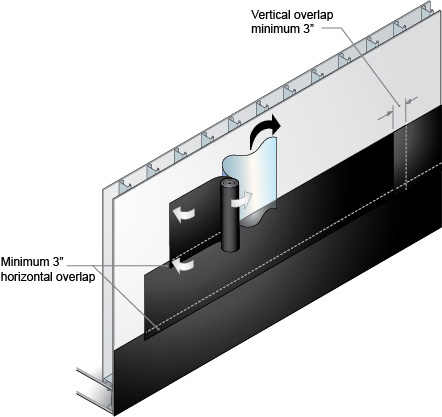
- Always install in a “weatherboard or shingle fashion” with the lower courses lapped under the upper courses.
- All penetrations including windows and doors must be installed in proper sequence to ensure a "weatherboard or shingle fashion” end result.
- All overlaps must be a minimum of 3” on horizontal and vertical seams.
- Inside and outside vertical corners should be minimum 6” of overlap.
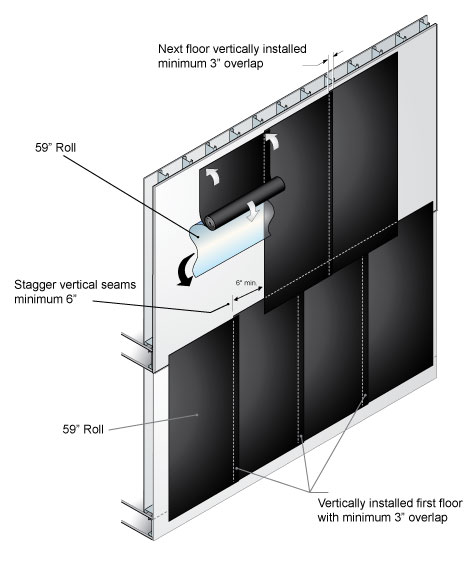
- Vertical seams should be staggered from floor to floor, or separated by a RevealShield SA Self-Adhered horizontally applied strip.
- Roll membrane with two-handed roller to ensure proper adhesion to substrate.
- Sustains twelve (12) months UV and climate exposure prior to cladding installation.
Substrate Information
- The substrate condition is crucial to the adhesion performance of any adhesive membrane.
- Substrates must be clean and free of any contaminants.
- Substrate surface must be dry to the touch with the ambient temperature above 20°F.
- RevealShield SA Self-Adhered can be applied to a wide variety of sheathing substrates:
- GlasRoc
- DensGlass Gold
- Most rigid insulation
- Pre-painted steel
- Precast concrete
- Concrete block
- Plywood
- Aluminum (painted or mill finish)
- Cast-in-place concrete
- Galvanized metal
- Rigid vinyl
- Steel
- Anodized aluminum
- For OSB applications please contact our technical team, 866-731-7663 opt. 5, E: [email protected] or use our Contact Form
- Primer is not required or recommended.
Installation Practices
During the installation process, RevealShield SA Self-Adhered must be protected at the leading edge to ensure liquid water does not travel behind the membrane.
For Open Joint Cladding Systems
- Maximum open joint size between cladding components is up to 2” horizontal and ½” vertical open joints.
- Maximum 40% total open wall area
Adhesive Curing Time
- Normal curing time is approx. 6 hours.
- Full adhesion will vary depending on job site weather conditions.
Floor Line Movement
- Buildings are designed to accommodate thermal and seismic movement.
- RevealShield SA Self-Adhered must be installed to allow this movement throughout the life of the structure.
- To accommodate floor-line movement in wood frame construction: Limit coverage area to a single floor and shingle subsequent layers over the top leading edge.
RevealShield SA Self-Adhered IS Non-Directional
- Install pieces vertically or horizontally.
- Ensure “weatherboard manner” by installing pieces over the top of the pieces below.
- Pieces are easily cut to size.
Penetrations
- Please refer to Details page for method and sequencing.
- Always ensure weatherboard result is achieved.
Original Packaging Functions as Dispenser
- Keep RevealShield SA Self-Adhered in original packaging
- Carefully lift one end of the product out of the box and slide the plastic wrap off
- Replace the roll in the box/dispenser and carefully remove the tape in the middle of the roll.
- Keep plastic roll cover to protect partial rolls during installation.
Manageable Lengths
- Pre-cut material into individual manageable lengths for installation by pulling material off the main roll to the desired length.
- Cut material square to the factory edges.
- Re-roll material same direction it came off the roll, with the release paper outward.
- Cut material to desired length with extended blade razor knife.
- Tip: pre-cut material for desired lengths for rough openings. Label as needed on release film with marker.
Single Worker vs. Two Worker Installation
- Using the material at its full width, 59”, vertical installation can be easily accomplished by a single worker.
- Horizontal installation of the full width material is best accomplished by two workers.
- Partial width rolls are easily installed by a single worker.
* Please see the Details for further clarification.
Vertical and Horizontal Installation
- Horizontal installation of the RevealShield SA Self-Adhered material is similar to the vertical installation method.
- The material can be applied either left to right, or right to left
Best Practice Installation Sequence
- Snap a level chalk line for guidance
- Pre-cut material to desired length
- Roll material with release paper facing OUTWARD
- Starting at a corner of the roll, peel back approx. 6” of release paper
- Cut the release paper with razor knife and tear the cut portion of the release paper exposing approx. 6” of glued surface
- Using hand pressure, lightly apply the exposed glue surface to the substrate
- Starting in the middle, use your hands to smooth out air bubbles, releasing the air to each side
- APPLIES ONLY TO VERTICAL INSTALLATION - Allow the rolled up material to drop down the wall, with the remainder of the release paper still attached, checking for proper alignment
- Reposition as needed - the material is very forgiving allowing for easy re-alignment
- When aligned, apply heavy hand pressure across the entire adhered section
- Roll up the material with release paper facing OUTWARD
- Slowly pull the release paper down the wall, allowing the rolled up material to unfurl
- Lightly smooth out air bubbles with wallpaper trowel
- Continue until all the release paper has been removed
- Pull back and reposition material (if necessary) as it unfurls
- Roll membrane with two-handed roller to ensure proper adhesion to substrate.
- Proceed with next step, ensuring a 3” minimum overlap to the adjoining material, always in a weatherboard manner
Installation Best Practices
- Avoid scoring the membrane at locations where the material overlaps onto the adjacent piece.
- Allow the top layer of material to span across the underlying layer without attempting to force the material into a 90° bend.
- Avoid stretching the material during installation at inside and outside corners.
- A full 6” overlap in either direction is recommended vertically at inside and outside corners.
- If desired adhesion is not attained between membranes due to site conditions, VaproShield recommends applying a bead of VaproBond as an additional solution to pressure rolling.
Storage
- Must be stored vertically
- Must be kept dry
- Must be stored in temperatures between 40° F and 120° F (4ºC - 49ºC)
- Must be protected from direct sunlight and inclement weather until ready for use
THIS IS NOT A SEQUENCE OF INSTALLATION STEPS. EACH IS A SEPARATE SCENARIO
 |
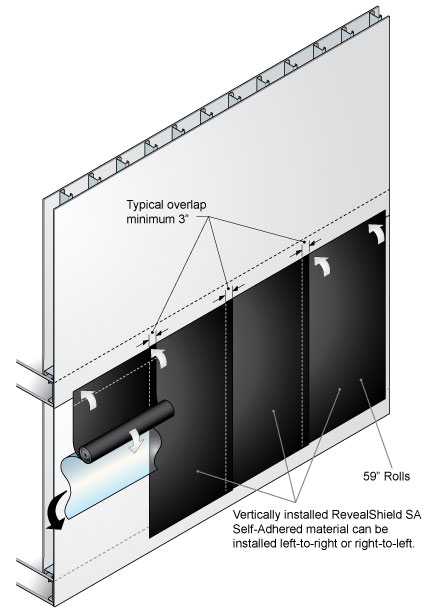 |
| Horizontal Installation | Vertical Installation |
 |
 |
| Multi-Floor Vertical Overlap | Vertical Installation with Horizontal Floor Line |